Alkalinity Titrator Project
Project by Taylor Smith, June 5, 2022
Introduction
Human caused emissions of greenhouse gases into Earth’s atmosphere continues to exacerbate ocean acidification, or the gradual decrease in the pH value of the Earth’s oceans. The greatest contributor to this ocean acidification is carbon dioxide. In 2020, the average amount of carbon dioxide in Earth’s atmosphere was 412.5 parts per million. In 2019, the United States alone emitted roughly 5.1 billion metric tons of energy related carbon dioxide. This massive amount of carbon dioxide in our atmosphere has many devastating effects and one of the most devastating effects is on our earth’s oceans.
The Alkalinity Titrator is a device created by Dr. Kirt Onthank, a professor of Biology at Walla Walla University. The goal of the device is to further ocean acidification research at the Biology Department at Walla Walla University. The device measures the alkalinity of a sample of water, which can be used to determine the acidity of the sample. The project’s initial creation was for a capstone project for the Engineering Department at Walla Walla University in 2019. The goal behind the project was to create an alkalinity titrator that is fully automated and cheaper to make than other commercial options.
During my senior year, I had chosen to contribute to this project as part of my senior project for the Computer Science Department at Walla Walla University. The goals of this project were to integrate a User Interface design with the alkalinity titrator’s physical hardware. In addition to implementing the UI on the physical device, a GUI was developed to allow ongoing development of the project by those who do not possess the physical device. This GUI functions as a simulated Titrator with mock devices, allowing a developer to step through the different menus and titration routines on their computer. This development will enable contributions by those who previously could not due to the inability to work with the physical hardware.
Alkalinity Titrator
At the start of development, the alkalinity titrator consisted of numerous devices thrown together in a poorly constructed housing. The device itself was not wired together and offered no functionality to the user. The device required proper rewiring, the addition of a fuse, and reinstallation of the device’s operating system. Components with this device included a syringe pump, magnetic stirrer, pH probe, heating element, two temperature probes, keypad and an LCD screen. Half of these components were missing at the start of the part project and were slowly replaced as development continued.
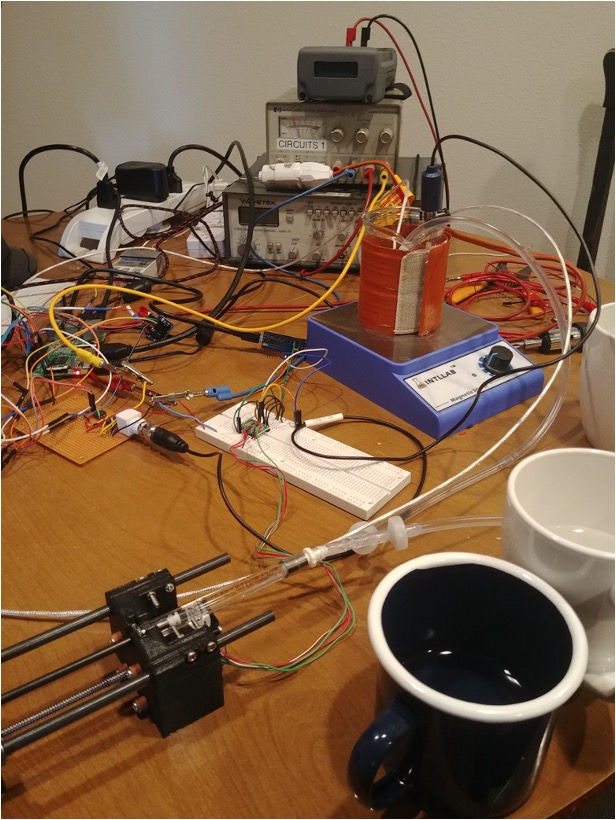
The Alkalinity Titrator uses a Raspberry Pi to drive the device. The Raspberry Pi uses CircuitPython, a low level Python library used to communicate with the Pi’s peripherals. In its perfect state, the tirator works being incrementally adding hydrochloirc acid in small amounts to a sample of sea water. The device provides proper heating, and stirring while the addition occurs. This process continues until the total amount of hydrochloric acid corresponds with a total alkalinity of a sample. However, the device has been unable to perform these functions since the initial engineering created the first prototype.
Since this project was initially created over three years ago, the device has gone through several iteration of development. The teams that worked on the device prior to me created the device’s housing, as well as created the device’s UI State Machine. The source code at the start of the project consisted of the UI State Machine and the initial prototype’s deive code. These two portions of code were poorly woven together and often did not perform as intended. Several UI states did not exist, many tests were missing, and outdated and unused code littered the source code. Additionally, the source code did not pass any tests at the start and many libraries had been depreciated.
Initial Progress
The start of this project involved two many areas: proper setup of the device and cleaning up the source code. In order to setup the Alkalinity Titrator, the device had to be completely rewired using the original schematic. This work was aided in part by Dr. Ralph Sterling, one of the engineering professors who assisted in the casing design. Additionally several holes were made in the casing to allow access for external cables. Eventually it was decided that the casing would only hinder development of the project so the core electronics were removed from the device and development continued without the case. A new operating system also had to be installed onto the Raspberry Pi as well as the configuration of the Pi’s peripheral communication ports. Once all of the hardware was setup, only the device’s keypad and LCD screen worked properly. More work had to be done after this point to get the rest of the Titrator’s components to function as intended.
The source code was another area that took significant work to get into a state that was ready for development. The first goal was to completely lint and check for spelling errors throughout the code. After this was completed, pytest was enabled and updated to perform the tests previously created by the past groups. Even after the test were working, many errors were generated due to depreciated code and poor naming conventions. Once the warnings were fixed, pytest only ran for Python 3.11. This was an issue as Python 3.9 is the standard Python version for Raspberry Pi. We implemented testing for Python 3.9, 3.10, and 3.11 to make sure that the source code would work for each of these versions to allow individuals with different to still run the code.
Integration of Devices
Overview
Each of the titrator’s device were updated to support easy integration into the UI state machine. This meant creating mocks of each of the device down to the lowest level. When the device is used in a test mode, it uses these mock to simulate the devices rather than the physical devices. This allows someone to test the expected behavior of the devices without the need to perform the tests with the physical machine. These mock were created to emmulate the lowest levels of the peripherals to ensure that the device mock code was the same as the physical device. Below is an overview of each device and significant changes to each.
LCD
The first device implemented was the LCD. Implementing the LCD allowed us to see device information and was essential for debugging the actual device. The LCD had previously used an lcd_interfaces.py file to output to the LCD rather than using the lcd.py file directly. This has now been changed to where UI states call the titrator’s lcd device directly. The lcd_interface.py file has now been removed as well as outdated lcd menus. A mock was also implement for the LCD that allowed the titrator’s graphical user interface to update asynchronously by the mock holding the LCD’s line and style values.
Keypad
The keypad was the second device implemented. This allowed movement through the different UI states as well as directly starting different device routines. Several areas of improvement for the keypad was an updated method of obtaining user input. The device uses a polling method, and it updates the UI state only once per each value entered. It does this by polling the keypad until it has captured a value that is not None. Once it recognizes a valid value it updates the device appropriately. A mock was created for this device using the graphical user interface’s buttons. Each button press would correspond to a new value ready to be polled.
pH Probe
Minimal updates were needed for the pH probe. The devices functions were implemented where needed in the UI states and a mock was created to simulate pH values.
Temperature Probes
The two temperature probes were implemented using pt100 probes. Previously the Alkalinity Titrator used pt1000 probes. This changed required an updates values to its calibration functions. Once the new resistance values were updated the temperature probes worked properly and were tested by comparing their value to that of a thermometer.
Heating Element and Temperature Controller
The temperature controller and heating element were updated to support several safety and test features. Safety checks were put in place to prevent the heating element from reaching a temperature higher than 80 C. It is important to note that this safety check only works if the temperature probes are properly calibrated though. The heating element was given its own class to implement tests that turned on the heating element without the temperature controller. These components were tested individually and then validated by trying to maintain a glass of water at a constant temperature. Currently a mock does not exist for the temperature controller.
Stir Controller
The stir controller was updated by refactoring the arduino code the motor uses, as well as implementing a new degas and get_timer function. The degas function allows a user to enter a time for which the spin control should operate. The device now supports a countdown timer that reports to the user how much time is left for the degas function. This was previously implemented in a blocking method but now the device runs in the background. It should be noted however that the stir controller does cause issues for the device LCD due to the close proximity of the magnet and the LCD.
Syringe Pump
The syringe pump had many of its functions update to support proper naming conventions, decrease repeated code, and eliminated sections of dead code. Many of the names for the function indicated the opposite of their intended use. Pump in would mean pull volume in at some place and push volume out in others. The syringe pump also now properly keeps track of the volume in the pump which it previously could not.
Graphical User Interface
Another area of development for this project was the implementation of a graphical user interface for developers. This GUI replaces the previous console GUI as the GUI before was using a blocking implementation. This means the Alkalinity Titrator was not free running when it was waiting for a user input. This would cause issues when certain values should be updated without user input such as temperature values, timers, and pH measurements.
The GUI was created using Python’s tkinter library. This library was chosen as it is a builtin library for Python and one of the most widely used graphical user interfaces for Python projects. Upon initialization of the GUI it creates several buttons and text field to emulate the LCD and keypad of the device (see image below). It then creates a separate thread to loop through once every millisecond to update the device’s screen. This separate thread allows for the GUI and the Alkalinity Titrator to operate independently of each other. This allow for a better simulation of how the device actually operates.
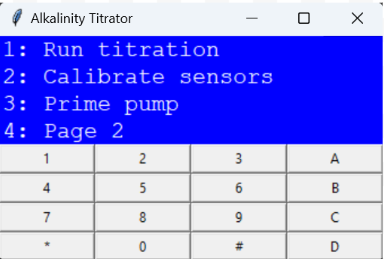
The GUI currently supports moving through the different UI states. Eventually this GUI could be improved upon by adding fields for sensor readout as well as input field for altering values as a titration occurs. This GUI would only be used for the purpose of testing and developing rather than actual titrations as it can adjust specific device values directly.
Conclusions
The alkalinity titrator now has all the device functions to support a manual titration. It does not have the UI states to support a manual or automated titration. This will have to be saved for future development. However the device now has considerably more test coverage as well as a new GUI that will greatly support future contributions.
Future Work
In the future it would be nice to have support for the GUI to present more titrator information rather than just what is presented on the lcd. Additionally several UI states need to be updated, include the settings, titration, and prime pump UI states. Additionally the manual and automated titration needs to be implemented as well.
Footnotes
The code for this project can be found on the GitHub and is fully open source Open-Acidification/AlkalinityTitrator
The Open Acidification website provides further information on the Open Acidification projects open-acidification